Building a Deals Page for Affiliate Marketing - Google Sheets to WordPress
Learn how to build a dynamic deals page using Google Sheets and WordPress! From automated screenshots to filtering tools, create a powerful hub for affiliate marketing.
Introduction
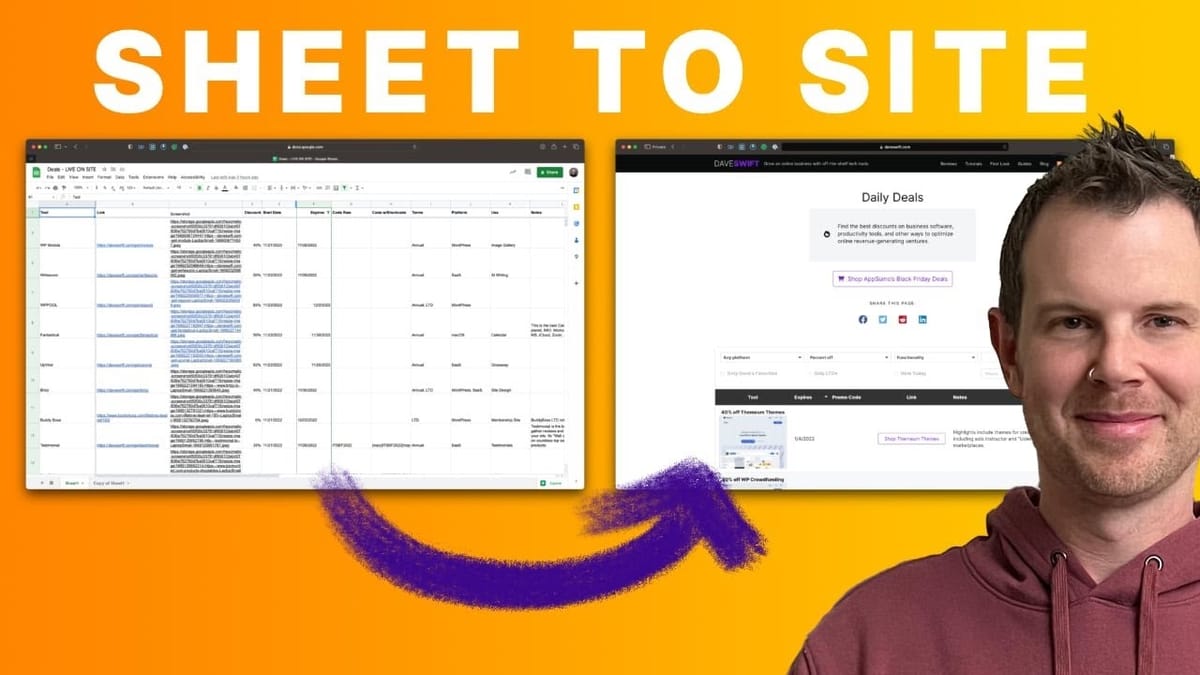
In today’s digital landscape, affiliate marketing has become a powerful tool for content creators and entrepreneurs to generate income while providing value to their audience. One effective strategy in this realm is creating a dedicated deals page that showcases curated offers and discounts. This article delves into the process of building a sophisticated deals page using Google Sheets and WordPress, as demonstrated by Dave Swift on his website, daveswift.com.
We’ll explore how to leverage tools like Ninja Tables Pro and Hexomatic to create a dynamic, user-friendly deals page that not only benefits your audience but also streamlines your workflow. From automating screenshot generation to implementing advanced filtering options, this guide covers all the essential steps to create a professional-grade deals page that stands out in the competitive world of affiliate marketing.
Whether you’re a seasoned affiliate marketer looking to optimize your strategy or a newcomer eager to set up your first deals page, this comprehensive guide will provide you with the knowledge and techniques to create a powerful tool for your affiliate marketing efforts. Let’s dive in and discover how to transform a simple Google Sheet into a robust, feature-rich deals page that will engage your audience and boost your affiliate sales.
daveswift.com/deals [00:00]
Dave Swift’s deals page on daveswift.com is an impressive example of how to create a comprehensive and user-friendly platform for showcasing affiliate offers. This section will explore the key features and benefits of the deals page, providing insights into why it’s an effective tool for both marketers and consumers.
Key Features of the Deals Page
- Extensive Product Selection: The deals page boasts hundreds of Black Friday deals and is maintained year-round with the best tech offers available.
- User-Centric Design: The page allows visitors to easily find products they’re actually interested in, rather than being bombarded with random ads or email promotions.
- Advanced Filtering: Users can quickly narrow down their search to specific categories, such as WooCommerce products available as Lifetime Deals (LTDs).
- Dynamic Table: The entire table is powered by Google Sheets, offering flexibility and ease of updates for the creator.
- Responsive Design: The deals page is optimized for both desktop and mobile viewing, ensuring a seamless user experience across devices.
Benefits for Affiliate Marketers
- Centralized Deal Management: By maintaining a single repository of deals, marketers can easily update and manage their offers without juggling multiple platforms.
- Increased Relevance: The filtering options help users find exactly what they’re looking for, potentially increasing conversion rates.
- Year-Round Value: By keeping the deals page active throughout the year, marketers can maintain consistent traffic and engagement.
- Customization: The use of Google Sheets as a backend allows for easy customization and addition of new deals or categories.
Benefits for Consumers
- Curated Selection: Users benefit from a handpicked selection of deals, saving time and effort in searching for relevant offers.
- Easy Navigation: The filtering system allows consumers to quickly find deals that match their specific needs or interests.
- Transparency: By showcasing expiration dates and discount percentages, the deals page provides clear information to help users make informed decisions.
- Regular Updates: With the page being maintained year-round, consumers can rely on it as a consistent source for the latest tech deals.
Impact on Affiliate Marketing Strategy
- Building Trust: By providing a valuable resource to users, marketers can establish themselves as trusted curators of deals in their niche.
- Increased Engagement: A well-designed deals page can encourage repeat visits and longer on-site time, potentially boosting overall site metrics.
- Diversified Income: By showcasing a wide range of products, marketers can diversify their affiliate income streams and reduce reliance on single products or vendors.
- Data-Driven Insights: The use of Google Sheets allows for easy tracking and analysis of which deals perform best, informing future marketing decisions.
By creating a dedicated deals page like daveswift.com/deals, affiliate marketers can provide significant value to their audience while optimizing their own workflow and potential earnings. This approach represents a shift from passive link sharing to active curation and management of affiliate offers, positioning the marketer as a valuable intermediary between consumers and product vendors.
Editing the table [01:11]
The heart of Dave Swift’s deals page lies in its dynamic and feature-rich table. This section will delve into the process of editing and managing this table using Ninja Tables Pro, a powerful WordPress plugin that enables seamless integration with Google Sheets. Understanding how to effectively edit and customize the table is crucial for creating a deals page that is both functional and visually appealing.
Setting Up Ninja Tables Pro
- Installation: Ninja Tables Pro needs to be installed and activated on your WordPress site. The pro version is essential for accessing advanced features like Google Sheets integration.
- Google Sheets Connection: The plugin allows for direct connection to a Google Sheet, which serves as the data source for the deals table.
- Column Selection: Users can choose which columns from the Google Sheet to import into Ninja Tables, providing flexibility in data presentation.
- Data Synchronization: The plugin can be set to automatically sync with the Google Sheet at regular intervals, ensuring the deals page always displays the most up-to-date information.
Customizing Table Columns
- Column Combination: Ninja Tables Pro allows for the combination of multiple Google Sheet columns into a single table column, enabling more complex data presentation.
- Visual Customization: Each column can be customized in terms of width, alignment, and styling to create a cohesive and attractive table design.
- Conditional Formatting: Advanced users can implement conditional formatting to highlight certain deals or categories based on specific criteria.
- Mobile Responsiveness: Column visibility and layout can be adjusted for different screen sizes, ensuring a good user experience on both desktop and mobile devices.
Implementing Filtering and Sorting
- Custom Filters: Ninja Tables Pro enables the creation of custom filters that allow users to narrow down deals based on various criteria like category, discount percentage, or vendor.
- Sorting Options: Users can implement sorting functionality, allowing visitors to order deals by factors such as price, discount amount, or expiration date.
- Search Functionality: A search bar can be added to the table, enabling users to quickly find specific products or brands.
- Filter Combinations: Advanced filtering options can be implemented to allow users to combine multiple criteria for more precise deal discovery.
Managing Data Updates
- Real-time Editing: Changes made in the connected Google Sheet are reflected in the WordPress table, allowing for quick updates and additions to the deals list.
- Bulk Editing: For large-scale changes, bulk editing features in Google Sheets can be utilized to efficiently update multiple deals simultaneously.
- Version Control: Implementing a version control system or backup schedule for the Google Sheet ensures data integrity and allows for easy rollback in case of errors.
- Collaborative Editing: If working with a team, Google Sheets’ collaborative features can be leveraged to allow multiple contributors to update the deals list.
By mastering the process of editing and managing the deals table, affiliate marketers can create a dynamic and user-friendly platform that not only showcases their offers effectively but also provides a valuable resource for their audience. The combination of Ninja Tables Pro and Google Sheets offers a powerful and flexible solution for creating a professional-grade deals page that can adapt to changing marketing needs and consumer preferences.
Using Transform Value [01:53]
The Transform Value feature in Ninja Tables Pro is a powerful tool that allows for dynamic content creation and formatting within table cells. This functionality is crucial for creating a visually appealing and informative deals page. In this section, we’ll explore how to effectively use the Transform Value feature to enhance the presentation of your affiliate deals.
Understanding Transform Value
- Concept: Transform Value allows you to combine multiple data points from your Google Sheet into a single, formatted table cell.
- Syntax: The feature uses a system of tokens or shortcodes to represent different columns from your spreadsheet.
- HTML Integration: Transform Value supports HTML, enabling you to structure and style the content within each cell.
- Dynamic Content: As the Google Sheet is updated, the transformed values in your table automatically reflect these changes.
Implementing Transform Value for Deal Presentation
- Combining Information: Use Transform Value to merge product name, discount percentage, screenshot, and link into a single, informative cell.
- Styling: Apply HTML styling to highlight key information, such as making the discount percentage bold or changing the color of certain elements.
- Creating Call-to-Action Buttons: Transform plain text links into attractive, clickable buttons to improve user engagement.
- Responsive Design: Implement conditional HTML to ensure the transformed content looks good on both desktop and mobile devices.
Advanced Transform Value Techniques
- Conditional Formatting: Use conditional statements within the Transform Value to display different content based on certain criteria (e.g., showing a “Hot Deal” label for discounts over 50%).
- Image Integration: Incorporate product images or logos alongside text information to create more visually appealing deal listings.
- Tooltip Implementation: Add hover effects or tooltips to provide additional information without cluttering the main table view.
- Custom Icons: Integrate icons (e.g., for different product categories) to enhance visual communication and make the table more scannable.
Best Practices for Using Transform Value
- Consistency: Maintain a consistent structure and style across all transformed cells to ensure a professional appearance.
- Performance Considerations: Be mindful of the complexity of your transformations, as very complex operations might impact table loading times.
- Testing: Regularly test your transformed cells across different devices and browsers to ensure compatibility and proper display.
- Documentation: Keep a record of your Transform Value formulas, especially for complex transformations, to facilitate future updates or troubleshooting.
By mastering the Transform Value feature, you can create a deals table that not only presents information clearly but also engages users with attractive, interactive elements. This enhanced presentation can lead to better user experience, increased time on page, and potentially higher conversion rates for your affiliate offers.
Automating Screenshots with Hexomatic [03:51]
In the world of affiliate marketing, visual content plays a crucial role in attracting and engaging potential customers. Automating the process of capturing and updating screenshots for your deals page can significantly streamline your workflow and ensure your content remains fresh and appealing. This section explores how Dave Swift utilizes Hexomatic, a powerful automation tool, to generate screenshots for his deals page efficiently.
Introduction to Hexomatic
- Purpose: Hexomatic is an automation tool that can perform various web-based tasks, including capturing screenshots of websites.
- Integration: It can be seamlessly integrated into your workflow, allowing for automatic updating of deal screenshots.
- Customization: Hexomatic offers various options for screenshot capture, including device simulation and image processing.
- Scalability: The tool can handle bulk operations, making it ideal for managing large numbers of deals.
Setting Up the Screenshot Workflow
- Workflow Creation: In Hexomatic, create a new workflow specifically for capturing deal screenshots.
- Input Configuration: Set up the input section to accept URLs of the deal pages you want to capture.
- Capture Settings: Configure the screen capture settings, including device type (e.g., laptop screen) and wait time for page loading.
- Image Processing: Set up image resizing and compression to ensure consistent and web-optimized screenshots.
Automating the Screenshot Process
- Batch Processing: Upload a list of URLs for new or updated deals to Hexomatic for bulk screenshot generation.
- Scheduling: Set up recurring tasks to automatically update screenshots at regular intervals, ensuring your deals page always displays current visuals.
- Error Handling: Implement error checking and notification systems to alert you of any issues during the screenshot process.
- Output Management: Configure the output to save screenshots with consistent naming conventions for easy integration into your deals table.
Integrating Screenshots into Your Deals Page
- Google Sheets Integration: Set up a system to automatically update your Google Sheet with new screenshot URLs.
- Ninja Tables Sync: Ensure your Ninja Tables setup is configured to pull in the updated screenshot URLs from your Google Sheet.
- Visual Consistency: Use Transform Value in Ninja Tables to ensure all screenshots are displayed consistently within your deals table.
- Fallback Images: Implement a system for fallback images in case of screenshot generation failures to maintain a polished look on your deals page.
Best Practices for Automated Screenshots
- Quality Control: Regularly review automated screenshots to ensure they accurately represent the deals and maintain high quality.
- Legal Considerations: Ensure you have the right to display screenshots of the products or services you’re promoting.
- Performance Optimization: Balance the frequency of screenshot updates with server load and page performance considerations.
- Backup System: Maintain a backup of previous screenshots in case of need for rollback or historical reference.
By implementing an automated screenshot system using tools like Hexomatic, you can significantly enhance the visual appeal and credibility of your deals page. This not only saves time in manual updates but also ensures that your audience always sees up-to-date and attractive representations of the deals you’re promoting. The combination of fresh visuals with detailed deal information can lead to higher engagement and potentially increased conversion rates for your affiliate marketing efforts.
Dave’s Favorite Checkbox Filter [05:35]
One of the standout features of Dave Swift’s deals page is the “Dave’s Favorite” checkbox filter. This personalized touch adds value to the deals page by allowing users to quickly identify products that come highly recommended. Implementing such a feature can significantly enhance user experience and potentially increase conversion rates. Let’s explore how to set up and utilize this type of custom filter in your deals page.
Setting Up the Favorites Column
- Google Sheets Setup: Create a dedicated column in your Google Sheet for marking favorite items.
- Marking Favorites: Use a consistent identifier (e.g., “Dave’s Favorite”) in the cells of this column for products you want to highlight.
- Data Consistency: Ensure the identifier is unique and easily distinguishable to avoid confusion with other data.
- Regular Updates: Periodically review and update your favorites to keep the selection fresh and relevant.
Implementing the Filter in Ninja Tables
- Column Configuration: In Ninja Tables, set up the Favorites column to be hidden from direct view in the table.
- Custom Filter Creation: Create a custom filter in Ninja Tables that targets the hidden Favorites column.
- Filter Labeling: Label the filter clearly (e.g., “Only Dave’s Favorites”) to make its function obvious to users.
- Filter Type: Set up the filter as a checkbox for easy toggling by users.
Enhancing User Experience with the Favorites Filter
- Prominent Placement: Position the Favorites filter in a noticeable location, such as at the top of the table or in a dedicated filters section.
- Visual Distinction: Consider using icons or color coding to make favorite items stand out even when the filter is not applied.
- Combination with Other Filters: Ensure the Favorites filter works seamlessly with other filtering options for maximum flexibility.
- Mobile Optimization: Verify that the filter is easily accessible and functional on mobile devices.
Leveraging the Favorites Feature for Marketing
- Curated Selection: Use the Favorites feature to showcase a carefully curated selection of top deals or products you genuinely endorse.
- Rotating Favorites: Regularly update your favorites to highlight different products, encouraging repeat visits to your deals page.
- Explaining Your Choices: Consider adding brief notes or reasons for why certain products are your favorites to add credibility and personal touch.
- Promotional Opportunities: Use your list of favorites for creating focused content, such as “Top Picks of the Month” blog posts or newsletters.
Best Practices for Implementing a Favorites Filter
- Transparency: Be clear about the criteria for selecting favorites to maintain trust with your audience.
- Balance: Ensure a good balance between favorite and non-favorite items to keep the feature valuable without overwhelming the general selection.
- User Feedback: Consider implementing a system for users to suggest their favorites or vote on products to make the feature more interactive.
- Performance Monitoring: Track the usage and impact of the Favorites filter to understand its effectiveness in driving engagement and conversions.
Implementing a personalized favorites filter like “Dave’s Favorite” adds a unique and valuable dimension to your deals page. It leverages your expertise and curation skills, providing users with a quick way to access top recommendations. This feature not only enhances the user experience but also reinforces your role as a trusted advisor in your niche, potentially leading to increased user engagement and higher conversion rates for your affiliate marketing efforts.
Click to copy [09:50]
Implementing a “Click to Copy” feature for promo codes on your deals page can significantly enhance user experience and potentially increase conversion rates. This convenient functionality allows users to quickly copy promotional codes without the risk of typos or errors. Let’s explore how Dave Swift implemented this feature and how you can incorporate it into your own deals page.
Understanding the Challenge
- User Convenience: Traditional methods of displaying promo codes often require users to manually select and copy text, which can be cumbersome.
- Error Prevention: Manual copying can lead to mistakes, especially with complex codes, potentially resulting in failed transactions and user frustration.
- Mobile Compatibility: On mobile devices, selecting and copying text can be particularly challenging, making a one-click solution highly valuable.
- Technical Limitations: Implementing this feature directly within Ninja Tables proved challenging, necessitating an alternative approach.
Implementing the Click to Copy Feature
- Plugin Selection: Dave uses the free WordPress plugin “Copy Anything to Clipboard” to enable this functionality.
- Shortcode Integration: The plugin uses shortcodes to wrap the text that should be copyable.
- Google Sheets Formula: A custom formula in Google Sheets automatically wraps the promo codes with the necessary shortcodes.
- Data Flow: The formatted codes are pulled from Google Sheets into Ninja Tables, preserving the clickable functionality.
Setting Up in Google Sheets
- Raw Data Column: Create a column for entering the original promo codes.
- Formatted Column: Set up an adjacent column with a formula that automatically wraps the codes in the plugin’s shortcodes.
- Formula Example: Use a formula like
=IF(A2<>"", "[copy]"&A2&"[/copy]", "")to generate the formatted codes. - Data Validation: Implement checks to ensure all promo codes are properly formatted before being displayed on the deals page.
Integrating with Ninja Tables
- Column Selection: In Ninja Tables, use the formatted column from Google Sheets instead of the raw data column.
- Visual Styling: Apply CSS styling to make the clickable codes visually distinct and attractive.
- Mobile Optimization: Ensure the clickable areas are large enough for easy tapping on mobile devices.
- Testing: Thoroughly test the functionality across various devices and browsers to ensure consistent performance.
Enhancing User Experience
- Visual Feedback: Implement visual cues (e.g., color change, checkmark icon) to indicate when a code has been successfully copied.
- Tooltip Instructions: Add tooltips or hover text to guide users on how to use the click-to-copy feature.
- Fallback Method: Provide a fallback method (e.g., manual selection) for users on devices that don’t support the click-to-copy functionality.
- Accessibility Considerations: Ensure the feature is accessible to users relying on screen readers or keyboard navigation.
Best Practices for Click-to-Copy Promo Codes
- Code Verification: Regularly verify that all promo codes are current and functional to maintain user trust.
- Clear Labeling: Clearly label the clickable areas as “Click to Copy” to make the functionality obvious to users.
- Expiration Dates: Include expiration dates alongside promo codes to prevent user frustration with outdated offers.
- Analytics Integration: Consider implementing tracking to measure how often the click-to-copy feature is used, helping you gauge its effectiveness.
By implementing a click-to-copy feature for promo codes, you’re significantly improving the user experience on your deals page. This simple yet effective functionality can lead to higher engagement rates, increased conversions, and improved user satisfaction. It demonstrates attention to detail and a commitment to user-friendly design, which can set your deals page apart in the competitive landscape of affiliate marketing.
Expiration Dates in Google Sheets [11:23]
Managing expiration dates for deals is crucial in maintaining an up-to-date and trustworthy affiliate marketing platform. Dave Swift’s approach to handling expiration dates using Google Sheets offers an efficient and automated solution. This section will explore how to implement and manage expiration dates effectively, ensuring your deals page remains current and reliable.
Setting Up Expiration Dates in Google Sheets
- Dedicated Column: Create a specific column in your Google Sheet for expiration dates.
- Date Format: Use a consistent date format (e.g., YYYY-MM-DD) for all entries to ensure proper sorting and filtering.
- Data Validation: Implement data validation rules in Google Sheets to ensure all entered dates are in the correct format.
- Conditional Formatting: Apply conditional formatting to visually highlight deals nearing expiration or those that have already expired.
Implementing Automated Filtering
- Filter Function: Utilize Google Sheets’ built-in filter function to automatically hide expired deals.
- Dynamic Date Reference: Use a formula that compares the expiration date to the current date (e.g.,
=FILTER(A2:Z, D2:D > TODAY())) - Buffer Period: Consider adding a small buffer period (e.g., 2-3 days) after the official expiration date to account for deals that may be extended.
- Regular Updates: Set up a routine to regularly update and review the filtered list to ensure accuracy.
Integrating with Ninja Tables
- Data Sync: Configure Ninja Tables to sync with your filtered Google Sheet data, ensuring only active deals are displayed on your website.
- Automatic Updates: Set up regular sync intervals between Google Sheets and Ninja Tables to keep your deals page current.
- Display Options: Decide whether to display the expiration date on your deals page, balancing transparency with aesthetic considerations.
- Sorting Functionality: Implement sorting options in Ninja Tables based on expiration dates, allowing users to view deals ending soon.
Enhancing User Experience with Expiration Dates
- Countdown Timers: For deals ending soon, consider implementing countdown timers to create urgency.
- Expiration Notifications: Set up a system to notify users of deals nearing expiration, either on the page or through opt-in notifications.
- Expired Deals Archive: Create an archive section for popular expired deals, noting their past availability and potential for future recurrence.
- Deal Renewal Tracking: Implement a system to track and update deals that are frequently renewed or extended.
Best Practices for Managing Expiration Dates
- Regular Audits: Conduct periodic audits of your deals list to ensure all expiration dates are accurate and up-to-date.
- Vendor Communication: Maintain open lines of communication with vendors or affiliate programs to stay informed about deal extensions or changes.
- User Feedback System: Implement a way for users to report expired deals that are still showing on your page.
- Transparency: Be clear about your policy on expired deals and how often your deals page is updated to maintain user trust.
Effectively managing expiration dates through Google Sheets not only keeps your deals page current but also enhances its credibility and user trust. By automating the process of filtering out expired deals and keeping your page updated, you can focus more on curating great offers and less on manual maintenance. This approach demonstrates professionalism and attention to detail, key factors in building a successful and respected affiliate marketing platform.
Mobile Responsiveness [12:07]
In today’s digital landscape, ensuring your deals page is fully responsive and user-friendly on mobile devices is crucial for success in affiliate marketing. Dave Swift’s approach to mobile responsiveness demonstrates how to create a seamless experience across all devices. This section will explore techniques and best practices for optimizing your deals page for mobile users.
Importance of Mobile Optimization
- User Demographics: A significant portion of internet users access content primarily through mobile devices.
- SEO Considerations: Search engines prioritize mobile-friendly websites in their rankings.
- User Experience: A well-optimized mobile experience can lead to higher engagement and conversion rates.
- Competitive Edge: Offering a superior mobile experience can set your deals page apart from competitors.
Implementing Responsive Design with Ninja Tables
- Responsive Settings: Utilize Ninja Tables’ built-in responsive design settings to ensure your table adapts to different screen sizes.
- Column Prioritization: Determine which columns are essential for mobile view and which can be hidden or collapsed.
- Touch-Friendly Elements: Ensure all interactive elements (buttons, filters, etc.) are easily tappable on smaller screens.
- Font Sizing: Adjust font sizes to ensure readability on mobile devices without requiring zooming.
Optimizing Table Layout for Mobile
- Stacked View: Implement a stacked view for mobile, where each deal is presented in a card-like format rather than a traditional table row.
- Collapsible Sections: Use collapsible sections or accordions to hide less critical information, allowing users to expand details as needed.
- Swipe Gestures: Implement swipe gestures for horizontal scrolling if maintaining a tabular format on mobile.
- Simplified Filters: Adapt complex filtering options into a more streamlined, mobile-friendly interface.
Enhancing Mobile User Experience
- Fast Loading Times: Optimize images and scripts to ensure quick loading on mobile networks.
- Clear Call-to-Actions: Make primary actions (like “Get Deal” buttons) prominent and easy to tap.
- Simplified Navigation: Implement a mobile-friendly navigation menu for easy access to different sections of your deals page.
- Search Functionality: Provide an easily accessible search feature to help mobile users quickly find specific deals.
Testing and Optimization
- Cross-Device Testing: Regularly test your deals page on various mobile devices and operating systems to ensure consistent performance.
- Performance Monitoring: Use tools like Google Analytics to monitor mobile user behavior and identify areas for improvement.
- User Feedback: Implement a system for mobile users to provide feedback on their experience.
- A/B Testing: Conduct A/B tests on different mobile layouts or features to determine the most effective design.
Best Practices for Mobile Responsiveness
- Mobile-First Design: Consider adopting a mobile-first approach when designing new features for your deals page.
- Progressive Enhancement: Start with a basic, functional mobile version and enhance it for larger screens.
- Consistent Branding: Ensure your mobile design maintains your brand identity and style.
- Accessibility: Pay attention to mobile accessibility guidelines to ensure your deals page is usable by all.
By prioritizing mobile responsiveness, you’re not only catering to a large segment of your audience but also future-proofing your deals page. A well-optimized mobile experience can lead to longer visit durations, higher engagement rates, and ultimately, increased conversions for your affiliate offers. Remember, a great mobile experience is no longer a luxury – it’s an expectation from users and a necessity for successful affiliate marketing in the digital age.
Advanced Shortcodes (Filtering by Start Date) [12:55]
Implementing advanced filtering options, such as filtering deals by their start date, can significantly enhance the functionality and user experience of your affiliate marketing deals page. Dave Swift’s use of advanced shortcodes in Ninja Tables demonstrates a sophisticated approach to managing deal visibility based on timing. This section will explore how to implement and leverage this feature effectively.
Understanding Advanced Shortcodes in Ninja Tables
- Purpose: Advanced shortcodes allow for dynamic filtering and display of table data based on complex criteria.
- Flexibility: These shortcodes can be used to create custom filters that go beyond basic sorting and searching capabilities.
- Integration: They work seamlessly with data pulled from Google Sheets, allowing for real-time updates and filtering.
- Customization: Advanced shortcodes can be tailored to meet specific needs, such as filtering by start dates, end dates, or custom categories.
Implementing Start Date Filtering
- Data Structure: Ensure your Google Sheet includes a dedicated column for deal start dates.
- Date Format: Use a consistent date format (e.g., YYYY-MM-DD) in your Google Sheet for accurate filtering.
- Shortcode Syntax: Utilize Ninja Tables’ shortcode syntax to create a filter that compares the current date with the start date of each deal.
- Dynamic Filtering: Set up the shortcode to automatically update based on the current date, ensuring only current and future deals are displayed.
Example Shortcode Implementation
- Basic Structure: Use a shortcode similar to
[ninja_tables id="TABLE_ID" filter="start_date>=TODAY()"] - Custom Column Names: Adjust the shortcode to match your specific column name for start dates, e.g.,
filter="deal_start>=TODAY()" - Additional Criteria: Combine start date filtering with other criteria, such as
filter="deal_start>=TODAY() AND category='tech'" - Date Calculations: Implement more complex date calculations, like showing deals starting within the next week:
filter="deal_start>=TODAY() AND deal_start<=TODAY()+7"
Enhancing User Experience with Start Date Filtering
- Upcoming Deals Section: Create a separate section or view for deals that haven’t started yet, allowing users to plan ahead.
- Countdown Timers: For deals about to start, implement countdown timers to build anticipation and encourage return visits.
- Email Notifications: Offer users the option to receive notifications when new deals become active.
- Calendar Integration: Provide options for users to add upcoming deal start dates to their personal calendars.
Managing Deal Visibility
- Pre-loading Data: Load deal information in advance but use shortcodes to control visibility based on start dates.
- Gradual Reveal: Implement a system to gradually reveal deal details as the start date approaches.
- Last-Minute Additions: Ensure your system can handle last-minute additions of deals without disrupting the filtering logic.
- Deal Extensions: Create a process for easily extending or modifying deal periods without needing to recreate entries.
Best Practices for Start Date Filtering
- Regular Updates: Ensure your Google Sheet is regularly updated to reflect any changes in deal start dates.
- Time Zone Considerations: Be clear about which time zone your start dates refer to, especially for a global audience.
- User Communication: Clearly communicate how your deals page works, including when new deals appear and how often the page updates.
- Performance Optimization: Monitor the performance impact of complex filtering and optimize as necessary to maintain fast page load times.
Implementing advanced shortcodes for filtering by start date adds a layer of sophistication to your deals page that can significantly improve user experience and the effectiveness of your affiliate marketing efforts. This feature allows you to create a dynamic, always-relevant deals page that automatically updates to show current offers. By mastering these advanced techniques, you can create a deals page that not only serves your audience better but also streamlines your own management process, allowing you to focus on curating great deals rather than manually updating your page.
Key Takeaways
Creating a powerful and effective deals page for affiliate marketing requires a combination of technical know-how, strategic planning, and user-centric design. Throughout this guide, we’ve explored various aspects of building a sophisticated deals page, drawing inspiration from Dave Swift’s implementation. Here are the key takeaways to remember:
- Integration of Google Sheets and WordPress: Leveraging Google Sheets as a backend for your deals page, combined with WordPress and Ninja Tables Pro, provides a flexible and efficient system for managing and displaying affiliate offers.
- Dynamic Content Creation: Utilizing the Transform Value feature in Ninja Tables allows for the creation of rich, informative deal listings that combine multiple data points into a single, attractive presentation.
- Automated Visual Content: Implementing tools like Hexomatic for automated screenshot generation ensures your deals page remains visually appealing and up-to-date with minimal manual effort.
- Personalized Filtering: Adding personalized filters, such as “Dave’s Favorites,” enhances user experience and leverages your expertise to guide users towards high-value offers.
- User-Friendly Features: Implementing conveniences like “Click to Copy” for promo codes significantly improves user experience and can lead to higher conversion rates.
- Expiration Date Management: Utilizing Google Sheets’ features for managing expiration dates ensures your deals page remains current and trustworthy.
- Mobile Responsiveness: Prioritizing mobile optimization is crucial for reaching a broader audience and improving overall user engagement.
- Advanced Filtering Techniques: Implementing advanced shortcodes for features like start date filtering adds sophistication to your deals page and enhances its dynamic nature.
By incorporating these elements into your affiliate marketing strategy, you can create a deals page that not only serves as a valuable resource for your audience but also stands out in the competitive landscape of affiliate marketing. Remember, the key to success lies in continuously refining your approach based on user feedback and performance metrics.
A well-designed deals page can become a central hub for your affiliate marketing efforts, driving traffic, building trust with your audience, and ultimately increasing your conversion rates. By automating many aspects of deal management and presentation, you free up time to focus on curating the best offers and building relationships with your audience.
As you implement these strategies, keep in mind that the world of affiliate marketing is always evolving. Stay open to new tools and techniques, and be willing to adapt your approach as technology and user preferences change. With dedication and the right tools, your deals page can become a powerful asset in your affiliate marketing arsenal, driving success and providing value to both you and your audience.